")
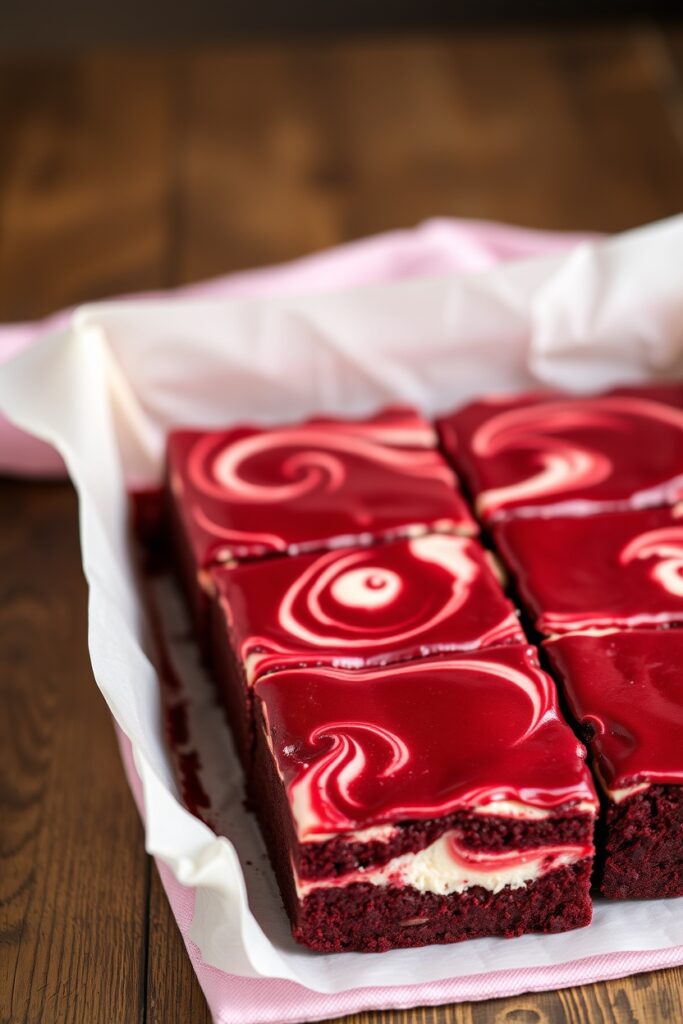
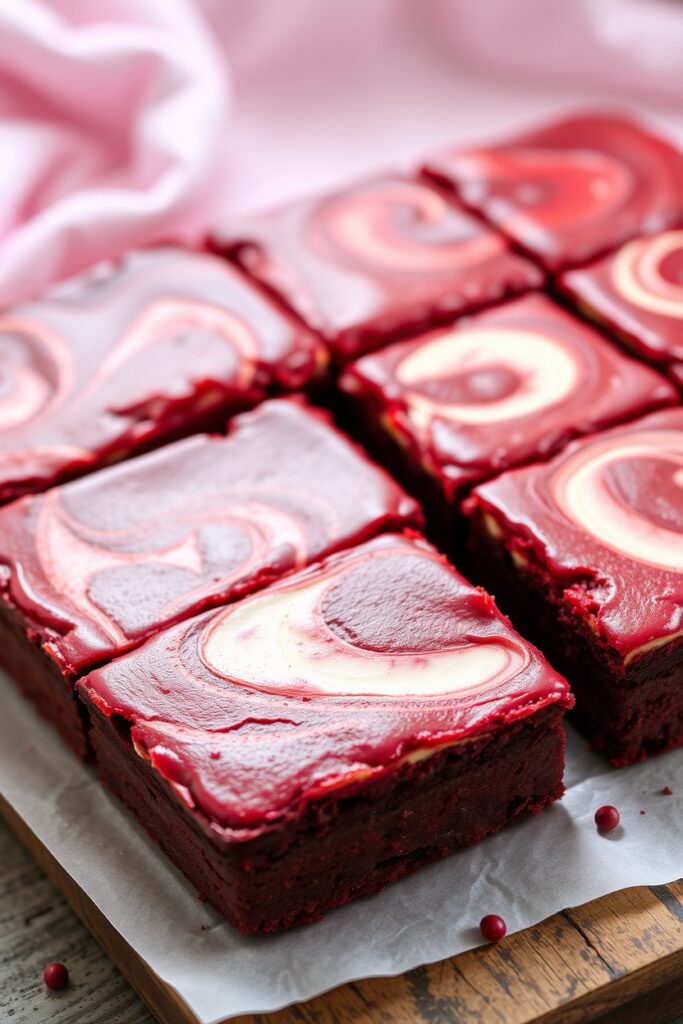
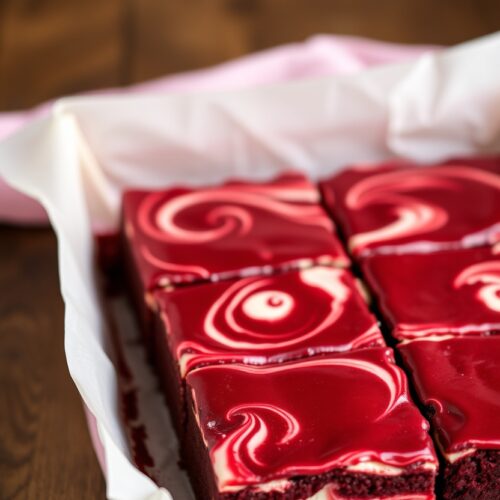
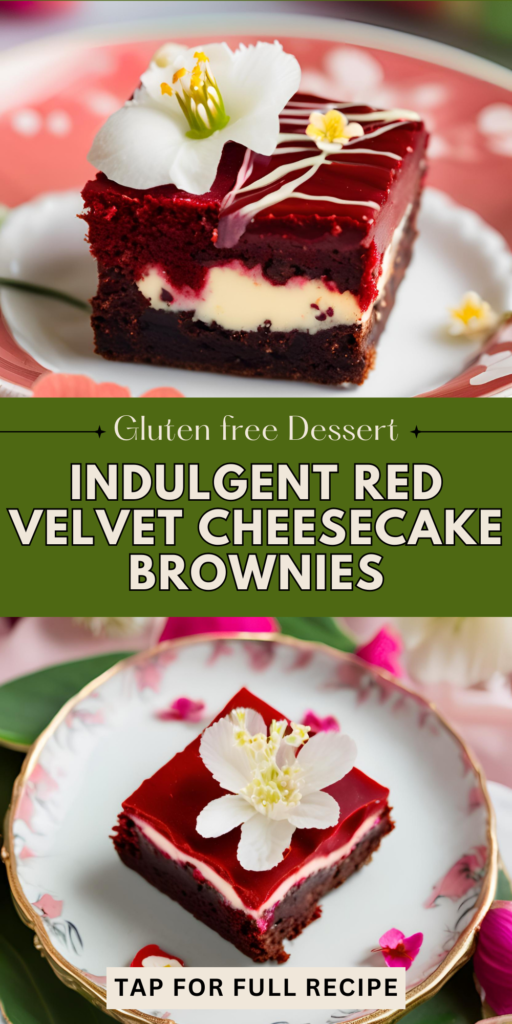
These rich and decadent red velvet cheesecake brownies combine the best of three worlds – the chocolatey goodness of brownies, the tangy sweetness of cheesecake, and the striking visual appeal of red velvet! Perfect for Valentine’s Day or any special occasion, these fudgy red velvet cheesecake brownies are guaranteed to impress. The contrast between the vibrant red brownie layer and creamy white cheesecake swirl creates a dessert that’s as beautiful as it is delicious! 🍫❤️
| Prep Time | Cook Time | Total Time | Servings | Difficulty |
|---|---|---|---|---|
| 20 minutes | 30-35 minutes | 55 minutes | 16 brownies | Intermediate |
A Love Story with Red Velvet Cheesecake Brownies
I’ll never forget the first time I made these red velvet cheesecake brownies from scratch! It was Valentine’s Day two years ago, and I wanted to surprise my boyfriend with something special that wasn’t just store-bought chocolates. Being a huge fan of both red velvet cake and cheesecake, I thought, “Why not combine them into brownies?” The moment he took his first bite of these easy red velvet cheesecake brownies, his eyes lit up, and I knew I had created something truly magical! Since then, these brownies have become our tradition for special occasions, and now I’m sharing my perfected recipe with you! What makes these brownies so special is how the rich chocolate flavor of the red velvet brownies complements the tangy cream cheese swirl perfectly. Each bite is a heavenly experience you’ll want to recreate again and again!
Why You’ll Love This Recipe ❤️

These fudgy red velvet cheesecake brownies are about to become your new favorite dessert! Here’s why:
- 🍰 Best of both worlds – combines the rich flavor of red velvet with the creamy tang of cheesecake!
- 😍 Stunning presentation – beautiful swirls make these perfect for impressing guests!
- 🎂 Rich texture – incredibly moist and fudgy, not cakey like some brownies!
- 🥄 Simple to make – easier than you think and worth every minute!
- ❤️ Perfect for occasions – ideal for Valentine’s Day, Christmas, birthdays, or anytime you need a special treat!
- 😋 Crowd pleaser – no one ever rejects brownies, red velvet, or cheesecake… and this recipe has all three!
- 🧁 Customizable – can be adapted for different dietary needs including gluten-free and vegan options!
Ingredients You’ll Need
For the Red Velvet Brownie Layer:
- Unsalted butter
- Granulated sugar
- Pure vanilla extract
- Cocoa powder
- Salt
- Red food coloring (gel or liquid)
- Vinegar (helps enhance the red color)
- Eggs
- All-purpose flour
- Chopped walnuts (optional)
For the Cream Cheese Layer:
- Cream cheese (softened)
- Sugar
- Egg
- Vanilla extract
Note: Scroll down to the recipe card section of the post for the ingredients with amounts included and for more complete directions.
Possible Substitutions
| Ingredient | Substitution Options | Notes |
|---|---|---|
| All-purpose flour | Gluten-free flour blend, almond flour | For gluten-free red velvet cheesecake brownies |
| Red food coloring | Beet powder, natural food dye | For healthy red velvet cheesecake brownies |
| Butter | Coconut oil, vegan butter | For dairy-free option |
| Cream cheese | Vegan cream cheese, cashew cream | For vegan red velvet cheesecake brownies |
| Eggs | Flax eggs, applesauce | For egg-free option |
| Sugar | Coconut sugar, monkfruit sweetener | For lower sugar version |
| Cocoa powder | Dutch-processed or regular | Both work well |
Equipment Checklist

| Essential Tools | Nice to Have | Why It’s Important |
|---|---|---|
| 8×8 inch baking pan | Silicone spatula | For smooth batter transfer |
| Parchment paper | Stand mixer | Makes mixing easier |
| Mixing bowls (2) | Kitchen scale | For precise measurements |
| Electric mixer | Cooling rack | For proper cooling |
| Butter knife or toothpick | Sifter | For lump-free dry ingredients |
| Measuring cups & spoons | Offset spatula | For neat spreading |
Step-by-Step Instructions

Preparing the Pan and Oven
- Preheat your oven to 350°F (175°C) – This is crucial for even baking and proper rising of your brownies.
- Prepare your pan – Butter an 8×8 inch baking pan, then line it with parchment paper, leaving an overhang on two sides. The overhang will help you easily remove the brownies after baking.
PRO TIP: Using parchment paper with overhang on two sides creates handles that make removing the brownies from the pan super easy and prevents them from breaking!
Making the Red Velvet Brownie Batter
- Create the brownie base – In a saucepan, melt the butter over medium heat. Transfer melted butter to a large bowl and add sugar, vanilla, cocoa powder, salt, food coloring, and vinegar, mixing between each addition.
- Add the eggs – Whisk eggs in a small bowl and then stir them into the cocoa mixture until well combined.
- Incorporate the flour – Fold in the flour until just combined – don’t overmix! If using, stir in chopped walnuts.
PRO TIP: For the most vibrant red color, use gel food coloring as it provides more intense color with less liquid, which won’t affect the texture of your brownies.
Making the Cream Cheese Layer
- Create the cheesecake mixture – In a medium bowl, blend together the softened cream cheese, sugar, egg, and vanilla until smooth and creamy.
Assembling and Baking
- Layer the batters – Pour most of the red velvet batter into your prepared pan, reserving about ¼ cup for the top. Gently spread the cream cheese mixture over the brownie batter.
- Create the swirl pattern – Drop spoonfuls of the remaining red velvet batter on top of the cream cheese layer. Use a butter knife or toothpick to swirl the batters together, creating a beautiful marbled effect. Don’t overdo it – a few figure-eight swirls will create the perfect pattern!
- Bake to perfection – Bake at 350°F for 30 minutes, or until a toothpick inserted in the center comes out with a few moist brownie crumbs.
- Cool completely – Allow the brownies to cool on a wire rack before cutting into squares. This may be the hardest part, but trust me, it’s worth the wait!
Pro Tips for Perfect Red Velvet Cheesecake Brownies 👩🍳
- 🧊 Chill ingredients properly – Make sure your cream cheese is at room temperature for a smooth, lump-free cheesecake layer, but keep your eggs cold for the best brownie texture.
- 🥄 Don’t overmix – Mix your brownie batter just until the ingredients are combined. Overmixing can lead to tough, cakey brownies instead of fudgy ones!
- 🎨 Color control – For the most vibrant red color, use gel food coloring as it provides more intense color with less liquid. You can also add 1-2 drops of green food coloring to the cheesecake batter for a festive Christmas look!
- 🔪 Perfect cutting technique – For clean-cut squares, refrigerate the brownies for an hour before cutting, and wipe your knife between cuts. Or pop the knife into the freezer for 20 minutes before slicing for even cleaner cuts!
- 🍫 Chocolate enhancement – For extra chocolate flavor, add ½ cup chocolate chips to the brownie batter or sprinkle them on top before baking.
- 👆 Swirl smartly – When creating the swirl pattern, less is more! Too much swirling will blend the layers together too much and you’ll lose the beautiful contrast.
- 💥 Bang the pan – After adding the layers, tap the pan gently on the counter a few times to remove air bubbles and help the layers settle evenly.
Serving Suggestions and Storage Tips
Serving Ideas
These red velvet cheesecake brownies are divine on their own, but here are some ways to take them to the next level:
- Serve warm with a scoop of vanilla ice cream for an indulgent dessert
- Dust with powdered sugar just before serving for an elegant look
- Drizzle with white chocolate ganache for extra decadence
- Cut into heart shapes using cookie cutters for red velvet cheesecake brownies Valentine’s treats
- Create mini red velvet cheesecake brownies by using a mini muffin tin instead of a baking pan – perfect for parties!
Storage Instructions
These brownies stay fresh and delicious for several days when stored properly:
- Room Temperature: Store in an airtight container for up to 2 days.
- Refrigerator: Transfer to an airtight container and store in the fridge for up to 6 days. Place parchment paper between layers to prevent sticking.
- Freezer: For longer storage, wrap individual brownies in plastic wrap twice, then place in a freezer bag. They’ll keep for up to 3 months. Thaw overnight in the refrigerator for best results.
Meal Prep Ideas
- Make a double batch and freeze half for later
- Prepare the brownie and cheesecake batters a day ahead and refrigerate separately, then assemble and bake when needed
- Cut into individual portions and pack for lunch boxes or quick desserts throughout the week
Nutritional Information
These brownies are certainly an indulgence, but moderation is key! Here’s the breakdown per brownie (based on 16 servings):
| Nutrient | Amount | % Daily Value |
|---|---|---|
| Calories | 338 | – |
| Total Fat | 21g | 27% |
| Saturated Fat | 13g | 65% |
| Cholesterol | 116mg | 39% |
| Sodium | 234mg | 10% |
| Total Carbohydrates | 33g | 12% |
| Dietary Fiber | 1g | 4% |
| Sugars | 23g | – |
| Protein | 5g | 10% |
| Calcium | 41mg | 3% |
| Iron | 1mg | 6% |
Health Benefits & Modifications
While these brownies are a treat, there are ways to make healthy red velvet cheesecake brownies:
- Use whole wheat flour or almond flour for added nutrients
- Reduce the sugar by ¼ cup
- Use natural food coloring from beet powder
- Opt for low-fat cream cheese to reduce calories
- Add chopped walnuts for healthy omega-3 fatty acids
For gluten-free red velvet cheesecake brownies, simply substitute the all-purpose flour with your favorite gluten-free flour blend in a 1:1 ratio.
Irresistibly Fudgy Red Velvet Cheesecake Brownies
Equipment
- 8×8 inch baking pan
- Mixing bowls
- Whisk
- Silicone Spatula
- Electric mixer (optional)
- Parchment paper
- Cooling rack
Ingredients
For the Red Velvet Brownie Layer:
- 1/2 cup Unsalted butter melted
- 1 cup Granulated sugar
- 1 tsp Pure vanilla extract
- 1/3 cup Cocoa powder
- 1/4 tsp Salt
- 1 tbsp Red food coloring gel recommended
- 1 tsp Vinegar white or apple cider
- 2 Eggs
- 1 cup All-purpose flour
- 1/2 cup Chopped walnuts optional
For the Cream Cheese Layer:
- 8 oz Cream cheese softened
- 1/3 cup Granulated sugar
- 1 Egg
- 1/2 tsp Vanilla extract
Instructions
Preparing the Pan and Oven
- Preheat your oven to 350°F (175°C).
- Prepare the baking pan: butter the pan and line it with parchment paper, leaving overhang on two sides for easy removal.
Making the Red Velvet Brownie Batter
- In a saucepan, melt the unsalted butter over medium heat.
- Transfer the melted butter to a large mixing bowl. Add sugar, vanilla extract, cocoa powder, salt, red food coloring, and vinegar, mixing well after each addition.
- In a separate bowl, whisk the eggs, then stir them into the cocoa mixture until fully combined.
- Gently fold in the flour until just combined. If desired, stir in chopped walnuts.
Making the Cream Cheese Layer
- In another bowl, beat together cream cheese, sugar, egg, and vanilla extract until smooth and creamy.
Assembling the Layers
- Pour most of the red velvet batter into the prepared pan, reserving about 1/4 cup for the top.
- Spread the cream cheese mixture over the red velvet batter evenly.
- Drop spoonfuls of the reserved red velvet batter on top of the cream cheese layer.
- Use a butter knife or toothpick to gently swirl the batters together, creating a marbled effect without overmixing.
Baking
- Bake for 30-35 minutes, or until a toothpick inserted in the center comes out with a few moist brownie crumbs.
- Allow the brownies to cool completely on a wire rack before cutting into squares.
Video
Notes
To make it vegan, use dairy-free butter, flax eggs, and a vegan cream cheese alternative.
Store brownies in an airtight container at room temperature for up to 2 days, or refrigerate for up to 6 days.
Enjoy these indulgent brownies as a perfect treat for any occasion!
More Delicious Red Velvet Recipes To Try
If you love these red velvet cheesecake brownies, you’ll also enjoy these related recipes:
- Red Velvet Cupcakes with Cream Cheese Frosting – Perfect for birthdays and celebrations
- Red Velvet Whoopie Pies – Portable handheld treats everyone will love
- Red Velvet Dream Cake – For when you need a show-stopping dessert
- Red Velvet Crinkle Cookies – A holiday favorite with beautiful crackled tops
These recipes share the same beautiful red color and rich flavor profile that make red velvet so beloved!
Have you tried making red velvet desserts before? What’s your favorite way to enjoy red velvet? Let me know in the comments below! 💬
Essential Tools for Perfect Brownies
| Tool | Why I Recommend It |
|---|---|
| Non-stick 8×8 metal baking pan | Conducts heat evenly, unlike glass pans that can lead to overcooked edges and undercooked centers |
| Parchment paper | Creates easy-lift handles for removing brownies in one piece |
| Silicone spatula set | Perfect for folding ingredients without overmixing |
| Electric hand mixer | Makes creating smooth cream cheese filling effortless |
Product Comparison: Red Food Coloring Options
| Product | Pros | Cons | Best For |
|---|---|---|---|
| Gel food coloring | Vibrant color, little liquid added | More expensive | Brightest red color |
| Natural red food dye | No artificial ingredients | Less vibrant color | Health-conscious bakers |
| Beet powder | All-natural, adds nutrients | Can alter taste slightly | Organic and vegan versions |
| Liquid food coloring | Widely available, affordable | Requires more product | Casual baking |
Frequently Asked Questions
1. Can I make these red velvet cheesecake brownies ahead of time?
Absolutely! These brownies actually taste even better the next day as the flavors have time to meld together. You can make them up to 2 days in advance and store at room temperature in an airtight container, or refrigerate for up to 6 days. For longer storage, freeze them for up to 3 months. Just be sure to wrap them well to prevent freezer burn!
2. Why did my brownies turn out cakey instead of fudgy?
There are a few reasons this might happen. First, overmixing the batter can incorporate too much air, resulting in a cakey texture. Second, using too much flour can dry out the brownies. Make sure to measure your flour correctly – spoon it into your measuring cup and level it off rather than scooping directly from the bag. Finally, overbaking is a common culprit. Remember that brownies continue to cook slightly as they cool, so it’s better to slightly underbake than overbake!
3. How do I get perfect swirls in my red velvet cheesecake brownies?
The secret to beautiful swirls is in the technique and timing! First, make sure your cream cheese is completely softened so it spreads easily. After adding the cream cheese layer, drop the reserved red velvet batter in dollops on top, then use a butter knife or toothpick to create swirls. The key is to not overdo it – a few figure-eight motions will create beautiful patterns without muddling the colors together. If you’re having trouble, try chilling the cream cheese layer for 10 minutes before adding the final red velvet dollops.
4. What’s the difference between Dutch-processed and regular cocoa powder for this recipe?
Both types will work for this recipe! Dutch-processed cocoa powder has been treated with an alkalizing agent, which gives it a darker color and milder flavor. It will produce slightly darker brownies with a smoother chocolate taste. Regular unsweetened cocoa powder has a more acidic, intense chocolate flavor. I personally prefer Dutch-processed for red velvet recipes because the deeper color provides a beautiful contrast with the red food coloring, but use whatever you have on hand!
5. How can I make these brownies vegan?
To make vegan red velvet cheesecake brownies, you’ll need to make a few substitutions. Replace the butter with vegan butter or coconut oil. Substitute the eggs with flax eggs (1 tablespoon ground flaxseed mixed with 3 tablespoons water per egg). For the cream cheese layer, use a vegan cream cheese alternative or prepare a creamy filling using cashew cream (blend soaked cashews with lemon juice and a little maple syrup until smooth). These tweaks will help you create vegan red velvet cheesecake brownies that are just as delightful and creamy as the original version! Keep the other ingredients the same to maintain the rich flavors.

I hope you’re as excited as I am to bake these red velvet cheesecake brownies! They’re perfect for every special occasion, especially Valentine’s Day, and they’re sure to delight anyone who takes a bite. Whether you’re making them for loved ones or just indulging yourself, these brownies are a treat you won’t want to miss!
Don’t forget to share your experiences and results in the comments! I’d love to hear how your red velvet cheesecake brownies turn out! If you loved this recipe, please pin it on Pinterest to save it for later. Sharing is caring, and your friends will definitely want to try this recipe too! 💗🍰✨

")


0 Comments